The Ultimate Beginners Guide to Cake Decorating Part I: Buttercream Scallop
Happy New Year to you. I know I have been on a hiatus for a while, but I am back and I have hit the ground running. So…. This happens to everyone at some point. You have a big celebration coming up and you want to make a cake. Everyone loves your baking, but your cake decorating skills… well, they are not so good. Plus, you see all those beautiful cakes, and wonder if you could make that? I’ve got your back. The Ultimate Beginners Guide to Cake Decorating will guide you through the steps from start to finish. In this three-part series, I will show you three simple buttercream cake designs that you can create with very little equipment or tools and it will look like you spent hours decorating. Shhh… I won’t tell anyone.
The first cake design is buttercream scallops, then cake decorating using chocolate shards and the third a beautiful drip cake. As a self-taught cake decorator, I have made my share of cakes with patchy frosting or the not so cool looking piping. It’s hard to believe it but many looked like the ones that appear on the show Nailed It. You know the one that was supposed to look like one thing but turned out to be something totally different. Shaking your head in agreement? I can help this beginner guide to cake decorating is just for you. Are you in? Ok good, let’s go.
This page may contain affiliate links which mean that if you make a purchase from any links directed from this website I may earn a small commission. I only recommend things that I use and love and the classes I have taken. Thank you very much for your ongoing support.
Essential Cake Decorating Tools
Before you get ready to decorate any cake, you need to make sure you have all the necessary tools. While you can get lost in the cake decorating store, you only need a few items to start.
- Turntable (I prefer the Wilton one for beginners because it locks)
- Cake board/cake circle (6-inch round, 8-inch round)
- Basic piping tips including Wilton Tip 1A
- Piping bags
- Cake drum/cake bases
- Cake pans (I suggest getting a 6-inch pan or 8-inch pan or a pan set to start)
- Offset spatula (large and small)
- Palette knife (optional)
- Serrated knife (medium and large)
- Gel food coloring
Prepping the cake
- The first step is process is to bake your cake. Cakes can be made into any shape. The basic cake shapes are either round or square ranging from 4 inches to 24 inches. The most popular cake pans sizes for recipes are 6, 8, and 9 inches.
- Adjust your recipe to fit the cake pan size. It is very important to remember is that a square cake uses more cake batter than a round cake. As a result, you will need to increase your recipe, sometimes even double the recipe. If your recipe calls for an 8-inch round cake and you need to make a 10-inch round cake you would need to scale your recipe to 1.6 times your original recipe. You can use this handy chart I created on how to half, double or triple a recipe. If you subscribe to our email list you get access to our resource library there is a recipe calculator that will tell you how much to scale your recipe.
- Cool your cakes completely before adding any frosting. Do not attempt to put buttercream on a warm cake, the buttercream will melt. I suggest placing the cake in the refrigerator for about 15 minutes before doing anything to the cake. This makes it easier to work with the cake layers.
Now, I know that you are a baker extraordinaire already right, so I can jump to filling, frosting and decorating the cake right? You can jump to the scalloped if you have mastered this section.
Leveling the Cake
There are a few ways to level a cake. One method is to bake the cakes already leveled. If you don’t have any additional equipment, no need to worry you can flatten your cake when it comes out of the oven using the paper towel method and skip the entire step about leveling your cake.
Let’s say you did not do that and you want the cake humps to snack on or for design (I’m not judging I promise). Here is how to level the cake. You are going to need a serrated knife or a cake leveler.
Method 1: Level the cake in the pan: With this method, you leave your cake in the pan, use the serrated knife make sure it is laying flush on the side of the cake pan, do not tilt the knife up, you want a clean slice. Then cut all the way across. You have a leveled cake. Woohoo.
Method 2: Use the turntable: your cake did not bake all the way to the top, but you still have a cake hump. Place the serrated knife at the section in the hump, while turning the cake turntable keep the knife in place until you the knife goes all the way through.
Method 3: The cake leveler: Adjust the cake leveler to the height that you need, then trim all the way across. This gets my vote, but then that’s one more equipment you have to buy.
Filling the Cake/Layering the cake
After the cake is leveled it is time to fill the cake. You can fill the cake with buttercream, fruit filling or ganache. I like to do a combination of both.
Before you add any filling, place a dam around the cake layer using buttercream or ganache. Do not place the dam too close to the edge or your filling will flow out. Use a wooden dowel and place a small hole in the center to release the air. This prevents any bulge that occurs when the cake settles. Then let the layers settle before adding the final frosting and/or fondant.
Cake Tip: When adding a filling add a small amount of frosting to the cake before adding the filling to prevent the cake from getting soggy.
Steps for filling a layer cake:
- Place the small amount of buttercream on a cake board the size of our cake. Then add the first layer right side up on the cake board.

- Add the cake board on a cake turntable (this makes the frosting a cake easier)
- Begin adding frosting and smooth with an offset spatula.
- Cake Tip: Another method is to fill a piping bag with a round tip or a coupler and pipe a ring around the outer edge. Then, place the frosting on the inside and use an offset spatula smooth out the frosting.
- Then add the next layer and frosting until you have added all your cake layers.
- Now, I usually trim the layers to remove the crust. This is a matter of preference. For this cake, I did not cut off the crust (it’s practice and if you are not good at this leave it).
- Use the excess buttercream to add a crumb coat on the cake. Add more frosting to the top if you do not have enough frosting, smooth with your offset spatula while you turn the turntable.
- At this point place the cake in the refrigerator to allow the frosting and filling to set.


Adding the Final Frosting to the Cake
After the cake has chilled it is time to add the final frosting. There are multiple ways to add the final frosting. My favorite method is using two cake boards to get a good amount of frosting all around see the step by step guide here for ganache and buttercream including a square cake. Another method is using the quick cake icer i.e. Wilton frosting tip 789 (see my step by step tutorial here). For this cake, the final frosting is the buttercream scallops.
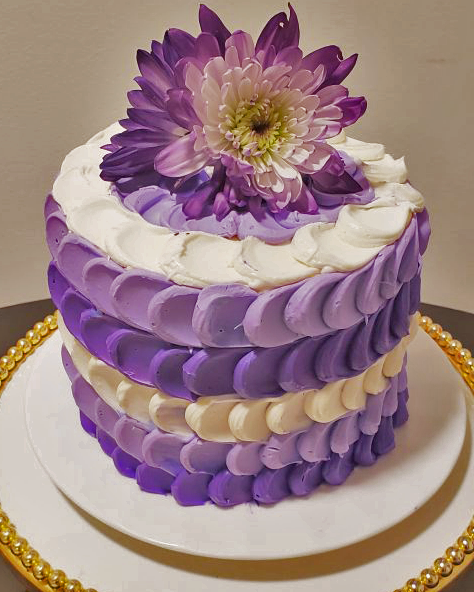
Decorating the cake with buttercream scallops
This is the fun part. Buttercream scallops are so easy to make and the final look is amazing. If you made it this far you are absolutely amazing.
You can make the scallops with an ombre effect or just plain. Both designs look great. To create an ombre effect mix your buttercream with color gel to create the darkest color,  then add a small amount to the next batch of frosting.
Then add frosting to a piping bag that is fitted with Wilton tip 1A or cut all your piping bags at the same point. It is easier to fill a piping bag if you place it in a glass. Do not fill the bags too much.
Once your piping bag or bags are filled you ready to decorate. Hold your hand at a 90-degree angle and using even pressure pipe a large dot, Release pressure and add them all in one line.
Use the back of a spoon or a palette knife and smooth a portion of the dot to look like this.  Add the layer of dots on top of the last dots to overlap each layer. Make the dots as small or as large as you like. Do this until you go all around the cake.
You can do the continue the same on the top of the cake or leave it the way it is. 
Decorate the cake with flowers or leave it the way it is. You will dazzle them.
That’s it Part I of the three-part series. Stay tuned for the buttercream shards and the final part the drip cake.

Related Posts
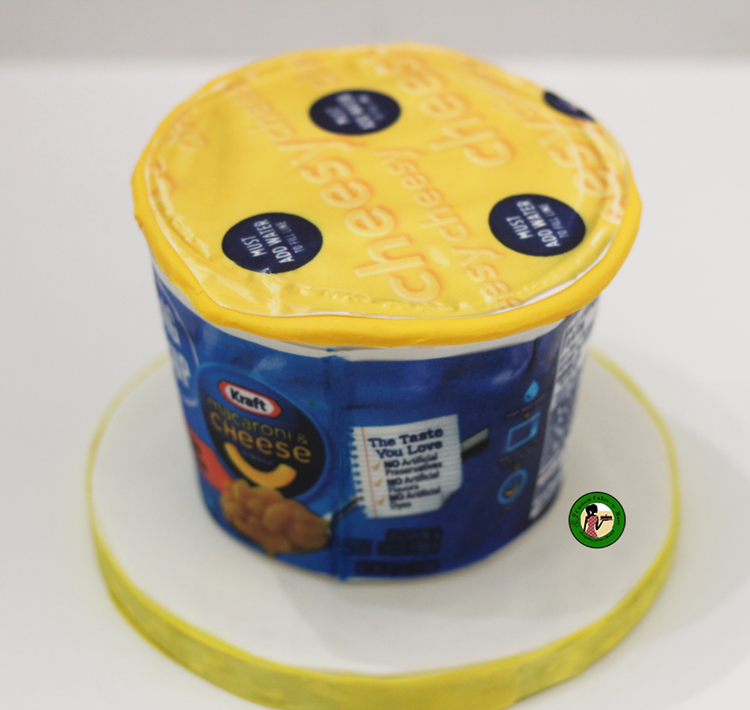
How to Make a Macaroni and Cheese Cake
This week I am switching things up a bit. Today I have a tutorial on
January 24, 2020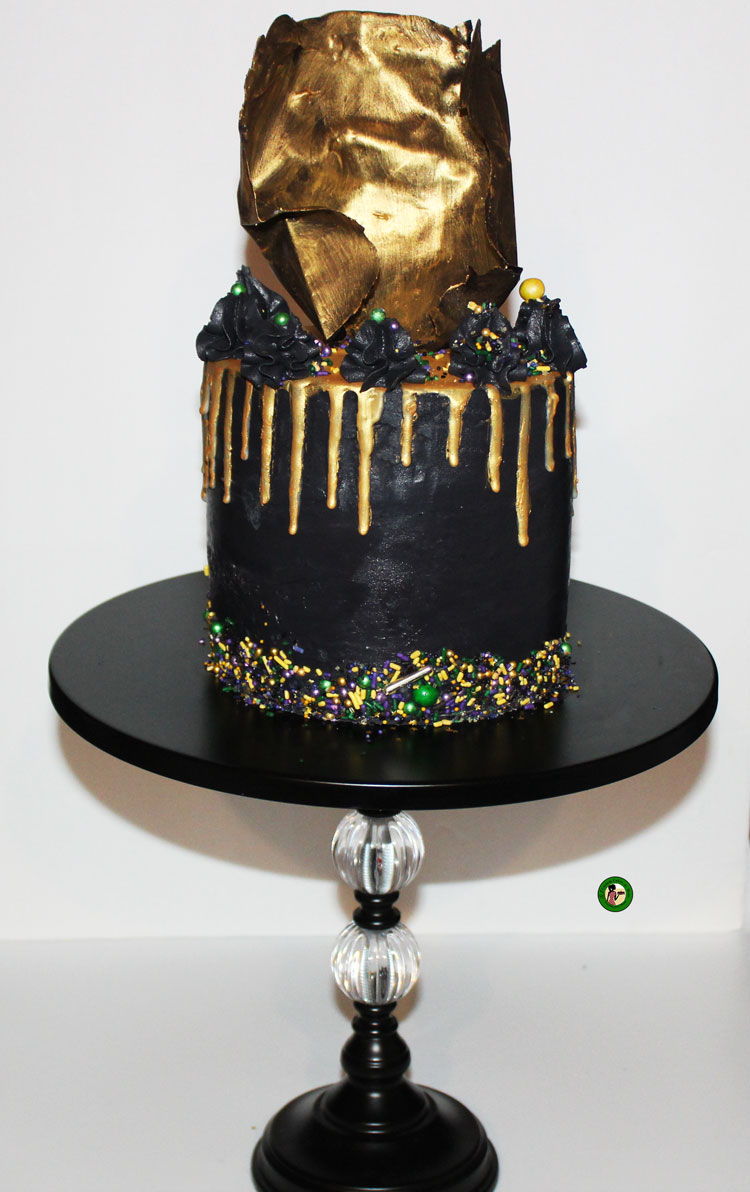
The Ultimate Beginners Guide to Cake Decorating Part III: How to Make a Drip Cake
Welcome to Part III of the Ultimate Beginners Guide to Cake Decorating. In Part I,
February 1, 2019